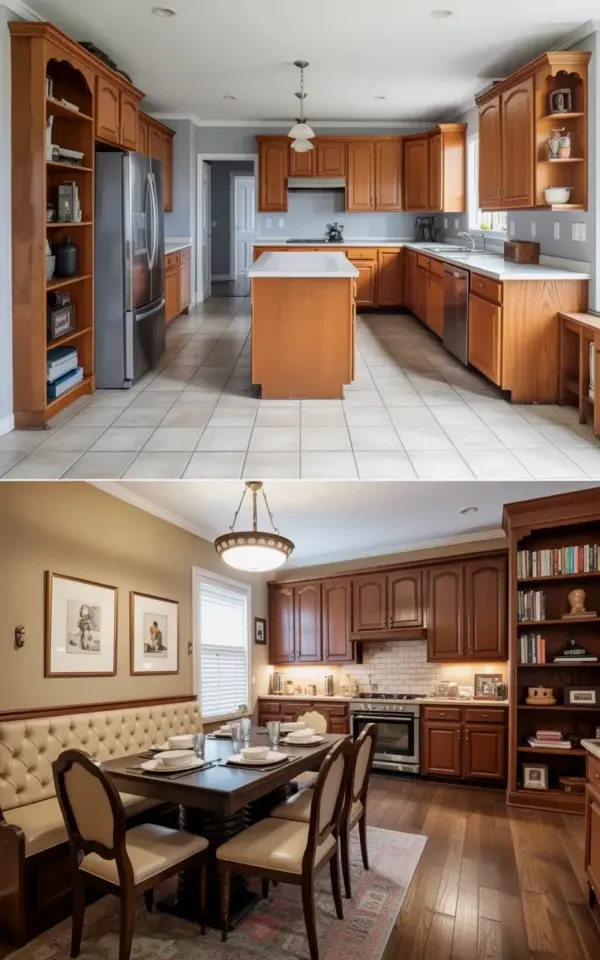
We almost sold our house over the kitchen. Not because it was broken, but because it was boring. The light oak cabinets, the beige floors, the gray walls, they all matched perfectly and said absolutely nothing. So this kitchen renovation became a rescue mission, and the before and after photos you’re looking at are the result of six weeks of sweat, sawdust, and a few very loud arguments.
Why We Chose a Cabinet Makeover Over Full Replacement
New cabinets were quoted at eleven thousand dollars. Eleven thousand. For wood boxes with hinges. I laughed, closed the laptop, and bought a quart of paint stripper instead.
A cabinet makeover is not the easy option. It is the affordable one. Our existing oak cabinets were solid, just dated and way too honey-colored. Replacing them felt like throwing out a perfectly good pair of boots because the laces were ugly. So we kept the frames, sanded everything down, and committed to a dark brown finish that would actually hold up.
Here’s the thing: if your cabinet boxes are sturdy and the doors close properly, you don’t need new ones. You need patience and the right products.
The Prep Work That Made or Broke This Kitchen Remodel
Somewhere between sanding and swearing, I learned that prep is 80 percent of a good kitchen remodel. The other 20 percent is picking a finish and not rushing the last coat.
We removed every door and drawer front, labeled them with masking tape, and stacked them in the living room. My dining table looked like a wood shop crime scene for a month. Then came the sanding. We started with 80 grit to strip the old varnish, moved to 120, and finished with 220 for a smooth base. Dust got everywhere. I mean everywhere. My coffee tasted like sawdust for two weeks.
- Use a liquid degreaser before sanding, especially near the stove, because grease hides under varnish and ruins adhesion.
- Always sand with the grain, not against it. Your arms will hurt either way.
- Fill every old hinge hole and blemish with wood filler, then sand those patches again.
- Wipe everything down with a tack cloth right before priming. One missed dust spot will show up like a zit.
We also removed the center island’s side panels to access the base. That was fun. Not really. But it was necessary, and it made the final paint job look professional instead of patched together.
Choosing the Right Finish for Dark Brown Wood
Here’s where I almost ruined everything. I wanted to use a cheap paint-and-primer combo from a big box store. My partner talked me out of it, and I’m still grateful.
For dark brown wood that actually looks like wood, you have two solid routes: a gel stain over a primed surface, or a tinted shellac-based primer followed by a matte polyurethane. We went with the gel stain. It goes on thick, hides the oak grain a little too well, but gives that rich, coffee-colored depth that the photo shows. If you want the grain still visible, use a wiping stain with a separate poly topcoat. If you want it smooth and modern, gel stain is your friend.
Prep and choosing the right finish are the two things that decide whether your before and after looks like a renovation or a tragedy. We tested the gel stain on the inside of a cabinet door first. Do that. Always test somewhere hidden.
We applied three coats of stain with a foam brush, let each one dry for 24 hours, then sealed everything with a water-based polyurethane in satin. Not gloss. Gloss would have screamed “amateur.” The satin finish catches the pendant lights nicely without being reflective enough to show every fingerprint.
Adding Built-In Shelving for Books and Decor
Once the cabinets looked like something out of a magazine, the walls around them looked empty. That’s when we added the built-in shelving you see on both sides of the frame. We built them from MDF and poplar, primed them, and painted them the same light gray as the walls so they blend in while creating contrast with the dark cabinets.
Here’s a confession: the shelves weren’t part of the original plan. I just wanted more prep space. But after staring at the empty wall for a couple of days, I realized it needed something vertical. Built-inshelves solved two problems at once, giving us storage for cookbooks and a place to display some decent-looking ceramics.
The shelves are three feet wide each, with three tiers, and they’re anchored into studs with heavy brackets. If you’re going to hold books and a heavy marble mortar, do not use drywall anchors alone. I say this from experience, and also from the sound of a mortar hitting the floor at 2 a.m.
What the Before and After Photos Don’t Show
The photo makes it look clean and quick. It wasn’t. There was a moment in week two when I seriously considered burning the whole house down and collecting the insurance money. The old varnish on the oak doors refused to come off in some spots, and in others, the wood splintered like balsa wood. We had to repair three doors with wood glue and clamps.
But the photo does capture the most important change: the room finally has a mood. The light oak reflected the beige tiles and made the whole space feel washed out. The dark brown wood anchors the kitchen, and the gray walls now look intentional instead of indecisive. The stainless steel appliances, side-by-side refrigerator, and matching island all pop against the darker cabinets. Even the pendant lights look better, because they’re shining down on a surface that actually absorbs light instead of bouncing it around like a mirror.
And the floors? Still beige ceramic tile. We didn’t touch them. Dark cabinets made them look almost elegant, which is funny because they’re the same boring tile we complained about for years.
Final Thoughts and Practical Tips for Your Own Kitchenremodel
If you’re thinking about tackling a similar kitchen renovation, don’t wait until you have the budget for new everything. Start with the cabinets. They’re the largest surface in the room, and changing their color changes everything else.
Buy more sandpaper than you think you need. Seriously. Double it. And don’t skip the primer, even if the can says it’s optional.
Remember that this kind of beforeandafter project is messy, smelly, and full of moments where you’ll doubt yourself. But walking into the kitchen now, with the dark cabinets and the built-in shelving full of books and little treasures, I wouldn’t trade it. The renovation cost a fraction of a full remodel, and the finish still looks brand new six months later.
If you’re planning your own cabinet makeover, save my post for reference. And when you’re knee-deep in sanding dust, just remember that the dark brown wood on the other side is worth it. Your future morning coffee will thank you.
This post was researched and drafted with AI assistance, then personally reviewed and edited by Mia before publishing.
Leave a Comment