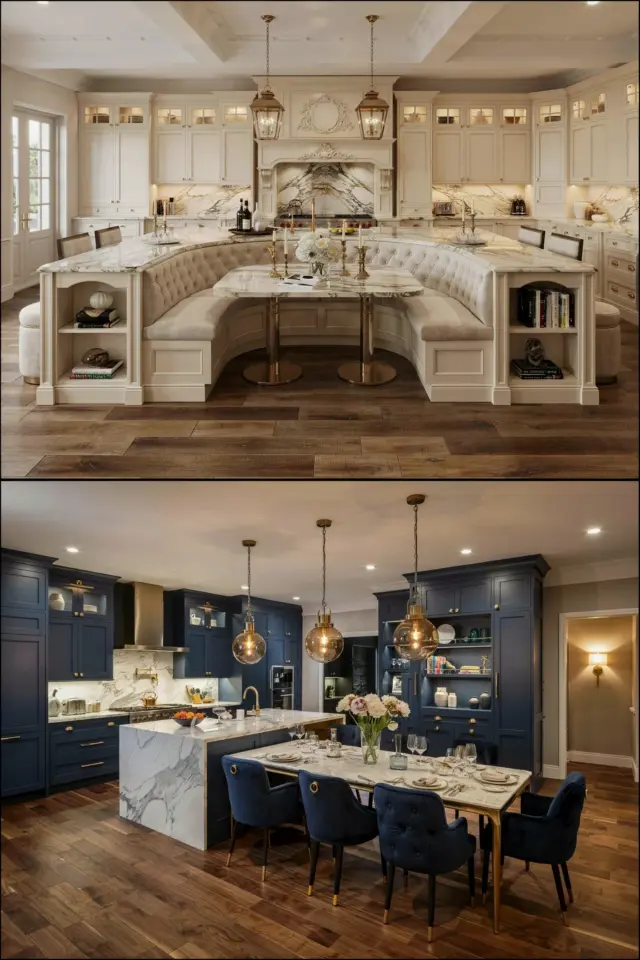
The moment I lowered myself onto the built-in bench of my new kitchen island, I heard a dull thud. My knees had just hit the cabinet face. That was the day I learned that a kitchen island with built-in seating can look perfect in photos and still fail in real life. You can avoid my mistake, but only if you plan for the body that sits there, not just the space you see in the render.
Measure Your Kitchen Traffic Flow Before You Sketch Anything
Start by watching how people actually move in your kitchen. You need a clear path between the island and the refrigerator, stove, and sink. That path should be at least 36 inches wide, but 42 to 48 inches feels much better when someone is seated.
Take a piece of painter’s tape and mark the footprint of your island on the floor. Then sit in a chair where the stool would go and have someone walk behind you. If their hips brush your back, your traffic flow is too tight for built-in seating.
The biggest mistake I see in dream kitchen ideas is placing the island too close to the perimeter cabinets. You save a few inches of floor space, but every mealtime becomes a choreography of apologies. Measure your walking route before you order anything.
Get the Legroom Dimensions Right for Built-In Seating
Legroom is not just about the space under the counter. It includes the depth from the front edge of the counter to the cabinet or toe kick behind it. For standard kitchen island with built-in seating, you need at least 15 inches of clear depth for your legs when you pull the stool in.
Most people think a 12-inch overhang is enough, but that only works if the seating is completely open underneath. If you plan a bench or a cabinet-backed design, add another 6 inches. I learned this the hard way when my own knees hit a false drawer front.
Use this simple checklist when you measure:
- Measure the depth from the counter edge to the back of the knee space (aim for 15 inches minimum)
- Check the height from the floor to the underside of the counter (should be at least 24 inches)
- Test with a real chair, not just a mental image
- Factor in your own height and that of taller family members
Pick the Correct Stool Height for Your Kitchen Island
Counter height and bar height are not the same, and mixing them up is a classic kitchen mistake. A standard counter sits at 36 inches, so you need a stool with a seat height of 24 to 26 inches. If your island surface is 42 inches high, choose a stool that seats you at 30 to 32 inches.
Built-in seating often means a fixed bench, which makes this even more critical. You cannot adjust a bench after the fact. I recommend building a sample corner with plywood blocks to test the seat height before you commit. Your feet should rest flat on the floor or on a foot rail, not dangle like you are on a kids’ swing.
For a hybrid design, consider an adjustable stool even if it is tucked under a fixed overhang. The extra cost is worth it when your mother-in-law visits and needs a lower seat. A little flexibility saves a lot of dinner table tension.
Plan the Counter Overhang So Knees Actually Fit
A typical countertop overhang for seating is 12 inches, but that is the bare minimum for a straight-backed stool. If you want built-in seating with a bench or a slanted back, your knees need more room. Go with a 15-inch overhang as your starting point, and increase it to 18 inches if you have taller people in your house.
The shape of the island matters too. A rounded corner can reduce the effective overhang distance for the person sitting at the curve. Keep that corner open or extend the overhang to compensate. I once measured a beautiful curved island and realized the seating spot only had a 10-inch overhang. No one could sit there without their knees touching the cabinet.
Also, think about the toe kick. A recessed toe kick of 3 to 4 inches gives your feet a place to tuck in, which adds perceived legroom without making the island deeper. This is a cheap fix that makes a built-in bench feel far more comfortable than it really is.
Leave Enough Walkway Clearance Behind the Seats
Seating on one side only is the safest layout for small kitchens. When you put seats on two sides, you create a walkway that cuts through the center of your work zone. You need at least 44 inches between the back of a stool and the nearest counter or appliance to let someone pass comfortably.
Behind built-in seating, the clearance is even more important because the seat back is fixed. You cannot slide the stool in further to create a temporary path. I suggest taking a dining chair and placing it exactly where the built-in seat will be. Then pretend to cook for ten minutes. You will quickly see if that walking space feels like a hallway or a hostage situation.
For kitchen design ideas, one-sided seating is almost always more functional than an island wrapped in stools. You keep the open side for prep work and traffic, and you still get the casual dining feel you wanted. If you really need two-sided seating, make the island at least 7 feet long and plan the seating on opposite ends, not adjacent sides.
Add Outlets and Lighting Before You Commit to the Layout
Built-in seating often means someone sits down for an hour with a laptop or a phone. That person will need an outlet, and you should include at least two on the island face or knee space. Pop-up outlets in the countertop work great for this, but they can interfere with the overhang if placed too far back.
Lighting is just as important as power. A single pendant over the center of the island may cast a shadow right onto your plate or keyboard. Install recessed or track lights that are offset toward the seating side, or use a linear suspension fixture that runs parallel to the counter edge.
I also recommend putting a dimmer switch on whatever light you choose. Bright task lighting works for meal prep, but it feels harsh when you are just sipping coffee and reading the news. A dimmer costs very little and makes the built-in seating useful at every hour of the day.
One last nugget: position outlets so they are reachable from a seated position, not tucked under the overhang where you have to bend awkwardly. Test the reach by sitting in the actual space and extending your arm. Your kitchen island with built-in seating should feel like a custom fit, not a compromise you simply tolerate.
At the end of the day, the perfect kitchen island is the one you actually use every morning. Take the time to measure your traffic flow, legroom, stool height, overhang, and clearance before you build. Your knees and your dinner guests will thank you.
If you are rounding out your kitchen design plans, save these tips and share them with your contractor. A little measuring now saves a lot of regret later.
This post was researched and drafted with AI assistance, then personally reviewed and edited by Mia before publishing.
Leave a Comment