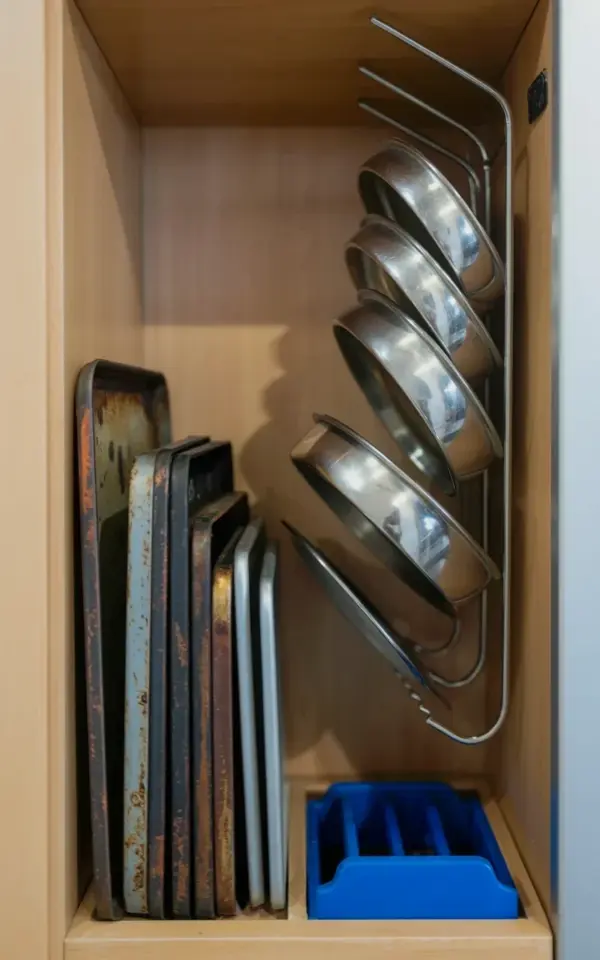
My cabinet used to look like a garage sale, and honestly, that was after I spent an entire afternoon on kitchen organization. Pots and lids lived in a precarious tower. Baking trays hid behind a stack of mixing bowls, so I’d pull out half the cabinet just to find the sheet pan. Then I moved the whole mess into a tall wooden compartment, added a mounted lid rack, and suddenly cooking felt easier. That’s the kind of cabinet storage win everyone should have.
## The Mistake That Made Me Buy a Mounted Lid Rack
For months, I stored pot lids in a vertical stack on the cabinet floor. Every time I grabbed a pot, the top lid slid off and clattered onto my knuckles. Worse, the smaller lids somehow migrated to the very bottom, which meant a dig every single time. Sound familiar?
The fix is a wall-mounted lid rack. In the photo you can see mine holding several stainless steel pot lids in a curved line, and it’s mounted on a diagonal support bar. That diagonal bar might look overengineered, but it lets each lid rest at a slight angle instead of clanging together flat. That one change removed ninety percent of the noise from my kitchen.
## Why Baking Trays Need to Stand Up, Not Pile Up
Look, sheet pans are like angry siblings. They take up as much horizontal space as they can, and they refuse to share. Stacking them flat means the middle trays get scratched, stained, or worse, impossible to grab without lifting the entire pile.
In the after photo, I keep several metal baking trays on the left side, standing vertically. They show dark marks and stains from years of use, sure, but now those stains stay on the pans instead of transferring onto every clean dish they touch. Standing them upright in a wooden compartment takes less space and makes the whole cabinet feel lighter. You don’t need a fancy divider, either. A plastic file holder or a sturdy magazine rack works just fine.
## Don’t Waste the Floor of Your Cabinet
The bottom of a tall wooden cabinet is prime real estate, but most people treat it like a dump bin. I was guilty of throwing cookie cutters, measuring spoons, and random lids into one jumbled heap. Then I found a blue plastic utensil holder at a dollar store and plopped it right on the bottom shelf.
That blue holder is not pretty. It’s scratched, slightly warped, and honestly the best single dollar I spent on kitchen cabinet storage. It keeps spatulas, whisks, and tongs from rolling into the tray pile. If you have a shallow drawer, you can use a utensil holder in there, but for this setup, the bottom of the cabinet works because it catches everything before you close the door.
## How to Choose a Lid Rack That Actually Works
Not gonna lie, I almost bought a tension rod version first. Then I read the reviews and saw a photo of someone’s cabinet door warping from the weight. So I went with a screw-mounted metal rack instead.
Here’s what I learned when picking one:
– Measure the inside depth of your cabinet first. Most racks need about six inches of clearance.
– Check the maximum lid size. My lids range from 8 to 12 inches, and the curved bar handles all of them.
– Look for a curved or angled design, because a straight bar lets lids slip straight off.
– Buy extra screws if your cabinet walls are thin. The included ones stripped out on me.
A mounted lid rack is more of a DIY storage project than sticking adhesive hooks on a door, but it’s still a weekend job. Just drill two holes, attach the bracket, and slide the bar in. My total time was maybe forty-five minutes, including a coffee break.
## The Before and After, Without the Filter
Before, opening that cabinet felt like gambling. After, it feels like a library for cookware. The light wooden compartment in the photo makes everything look calmer, but the real change is practical. Trays slide out in one motion. Lids sit in a neat curve. The blue holder keeps tools in place.
Here’s the biggest difference: I used to lose at least five minutes getting the right pan. Now I open the door, grab the tray or lid I need, and close it. That’s it. No digging, no frustration, no quiet swearing from inside the pantry.
Honestly, I didn’t expect a few storage additions to change how I cook. But pantry organization is less about looking perfect and more about removing obstacles between you and the meal. This simple before and after did exactly that.
## Copy This Setup Without Spending a Ton
If you want to recreate this look, you don’t need custom inserts or an expensive cabinet system. You need a mounted lid rack, a way to stand trays upright, and a small container for utensils.
My exact setup came from three places: a lid rack from the hardware store, a blue holder from the dollar store, and wooden crates from a garage sale. The trays and lids are the same ones I already owned.
One more tip: don’t try to organize everything at once. Start with the cabinet that annoys you the most, attach the rack, stand up the trays, and put a container on the floor. Try cooking dinner with that setup for a week. Then touch another cabinet. That’s what I did, and now every time I see the image of that wooden cabinet with the neat row of lids and upright trays, I feel a little too proud of myself.
Anyway, go open your own cabinet and see what’s bugging you. A small change might turn your worst storage spot into your favorite part of the kitchen.
This post was researched and drafted with AI assistance, then personally reviewed and edited by Mia before publishing.
Leave a Comment