You are staring at your kitchen cabinet right now, aren’t you? The one where you have to perform a careful balancing act just to grab a coffee mug without sending a cereal bowl crashing to the floor. I have been there, and honestly, it takes about ten minutes of frustration before you finally commit to a real plan for kitchen cabinet organization.
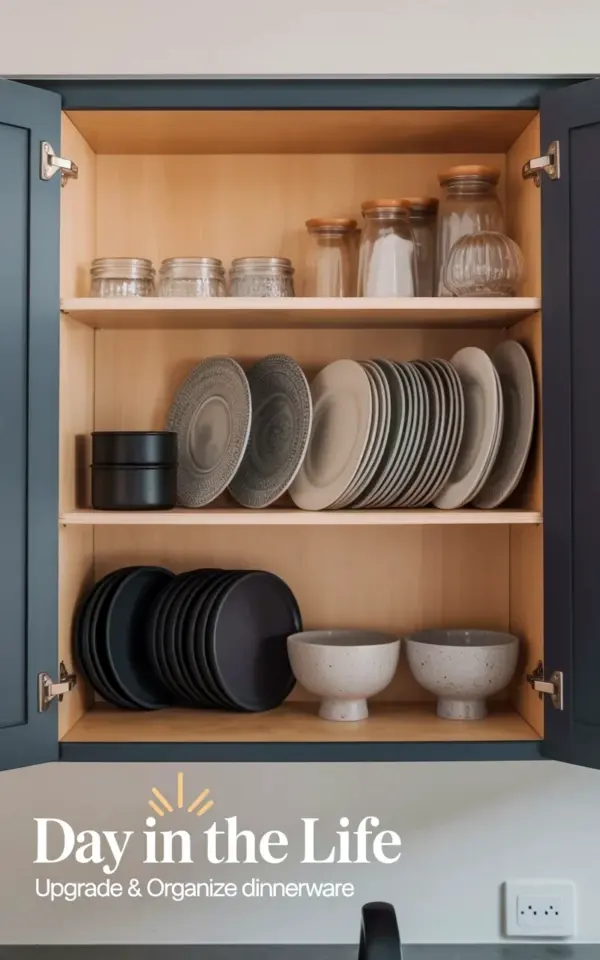
The good news is that the solution often looks exactly like the photo you just pinned. It features a simple wooden cabinet with black hardware, and inside, everything has a designated spot. The visual appeal comes from the wooden dividers, which split the shelves into clean sections for glass jars, neat rows of gray and white plates, and even those awkward black lids stored flat. It is a practical system that feels completely achievable, even if you have zero experience with home improvement projects.
Let me walk you through how this cabinet shelf idea actually works in real life. No fancy tools, no contractor required, and no need to buy an entirely new set of dinnerware. This is about working with what you already own and finally giving it a home.
Why Your Shelves Turn Into a Chaotic Mess in the First Place
It is never really about you being messy. It is about the fact that your shelves are just one wide open space, a giant void where stacks of dishes slide sideways and lids migrate to the back. There is no physical boundary to tell a plate where it belongs, so everything just merges into a single, unstable tower of ceramic.
Wooden dividers introduce a simple concept that changes everything: they create rooms within your shelves. Think of your cabinet as a studio apartment. It functions, but there are no walls. Adding a divider is like building a wall, suddenly you have a living room, a kitchen, and a bedroom, all in the same square footage.
Here is the thing, you don’t need to be handy to do this. You just need to measure the width of your shelf and find a tension rod or a wooden partition that fits the space. It is genuinely that simple.
The Winning Cabinet Shelf Idea: Private Sections for Every Item
Look closely at the setup in the photo, because it nails the concept of visual grouping. The top shelf holds clear glass jars and containers, creating a uniform look because the contents are visible and organized. The second shelf is where the dinnerware organization really shines, with gray textured plates and white plates standing upright in neat rows.
The third and fourth shelves are the unsung heroes, though. Black circular lids are stored horizontally, stacked like vinyl records, and a couple of speckled gray bowls sit nearby. This separation matters because lids are the absolute worst thing to store vertically. They roll. They fall. They hide behind soup cans.
The trick to making this cabinet shelf idea work is to group items by how you use them and how often you need them. Everyday plates get the prime, waist-level shelf. Glass jars that hold leftovers can go a little higher. Those specialty bowls you only use for snacks can live on a lower shelf.
What You Actually Need to Get Started
Before you empty all your cabinets onto the kitchen counter, take a deep breath. You do not need to buy a custom closet system for your kitchen. You just need a few specific items, most of which are surprisingly affordable.
– Wooden dividers or expandable shelf separators. I prefer the solid wood ones because they feel sturdy and look intentional, but the expandable metal ones work too.
– A tape measure. You will need the width of your shelf and the height between your shelves.
– Felt pads or rubber grips. You want to protect your cabinet finish and stop the dividers from sliding around.
– A clear plan for your dinnerware organization. Know which plates you use daily and which ones you are saving for a holiday that never comes.
That is the whole list. Look, you might already have the tape measure and the felt pads, which means the only real purchase is the dividers themselves.
How to Set Up Wooden Dividers Without Losing Your Mind
Start by emptying the shelf completely. I am serious, take everything out, wipe down the surface, and look at the bare space. This is your blank canvas. Measure the interior width, then decide how many sections you want. Two sections is usually enough for most standard cabinets, but three can work if your shelf is particularly wide.
Slide the first wooden divider into place, pressing it firmly against the back of the cabinet. You want it tight, but not so tight that it bows the shelf. Place your plates upright between the dividers, using one hand to hold the divider steady while you slide the dishes in with the other.
Here is a practical tip from someone who has done this a few times: do not overstuff a section. If you have to force a plate into the space, you will hate the system by Tuesday. Leave a little breathing room so you can grab a dish without creating a domino effect.
The “I Can’t Afford Custom Shelves” Reality Check
You might be looking at this cabinet shelf idea and thinking it looks expensive. The irony is that the wooden dividers in the photo are likely the cheapest part of the entire setup. The real investment here is your time and your willingness to declutter.
If you are on a tight budget, skip the fancy wooden dividers and use sturdy cardboard boxes cut to size, or even heavy books wrapped in shelf liner. It will not win any home decor awards, but it will function the exact same way. You can upgrade to wood later when you feel like it.
I have a confession to make. I used stackable shoe boxes as dividers in my pantry for six months before I finally bought real wooden ones. Nobody saw it except me, and it worked perfectly. Do not let perfectionism stop you from starting.
Fixing the Lids Problem (It Deserves Its Own Section)
Storing lids is the eternal struggle of dinnerware organization. They are round, they are awkward, and they never stack the way you want them to. The photo solves this by keeping them flat on a dedicated shelf, and honestly, that is the only method that works.
When you stand a lid on its edge, it becomes a wheel. It rolls to the back of the cabinet, knocks over the measuring cups, and generally ruins your vibe. Storing them horizontally in a dedicated section with wooden dividers keeps everything visible and accessible.
You can also use a simple wire cooling rack as a makeshift lid organizer. Set it at the back of the shelf and stack your lids like CDs in a holder. It gives you vertical storage without the rolling problem, and it uses that weird dead space near the back of your cabinet.
Make It Look Effortless With a Few Adjustments
The reason the photo looks so satisfying is that every item has a consistent orientation. The plates face the same direction. The jars are lined up by height. The speckled bowls are grouped together. None of that happened by accident, someone took five extra minutes to arrange it properly.
You do not need to be obsessive about it, but giving your items a little attention makes the whole cabinet feel calmer. Store the lids with the pull tab facing up. Put the plates with their decorative rims facing forward. Point the handles of your glass jars the same way.
And here is a weird little thing I noticed after setting up my own cabinet: a little empty space on a shelf is a good thing. It gives your eye a place to rest. It makes the shelf look intentional instead of crammed. Do not feel the need to fill every single inch.
Beyond the Photo: Taking This Idea to Other Cabinets
Once you fix your main dinnerware cabinet, you will see opportunities everywhere. The same wooden dividers work in your pantry for cutting boards. They work in your bathroom for extra towels. They even work in your office for storing notebooks and files that refuse to stay upright.
The beauty of this system is that it is scalable and forgiving. You can adjust the dividers whenever your collection changes. You can remove them entirely if you decide to go in a different direction. It is not a permanent commitment, it is a helpful tool.
That is why this specific cabinet shelf idea is so popular. It solves a problem without locking you into a rigid setup. You get the satisfaction of an organized space, but you keep the flexibility to change your mind later.
A Quick Word on Maintaining the System
You are going to love the way it looks for about two weeks. Then real life happens, you get takeout, you stack a dish awkwardly, and suddenly the system feels broken. It is not. You just need to do a quick reset.
Every few weeks, spend thirty seconds straightening the dividers and fluffing the stacks. That is it. The system is forgiving enough that it does not demand a full reorganization every time you use a plate.
Eventually, putting a dish away correctly becomes muscle memory. You will slide the plate into its designated slot without even thinking about it. And you will wonder how you ever lived with those teetering towers of ceramic in the first place.
So go ahead and save this cabinet shelf idea for later, and when you are ready, grab a tape measure and take the plunge. Your cabinets will thank you, and honestly, your morning coffee routine will feel a whole lot more peaceful.
This post was researched and drafted with AI assistance, then personally reviewed and edited by Mia before publishing.
Leave a Comment