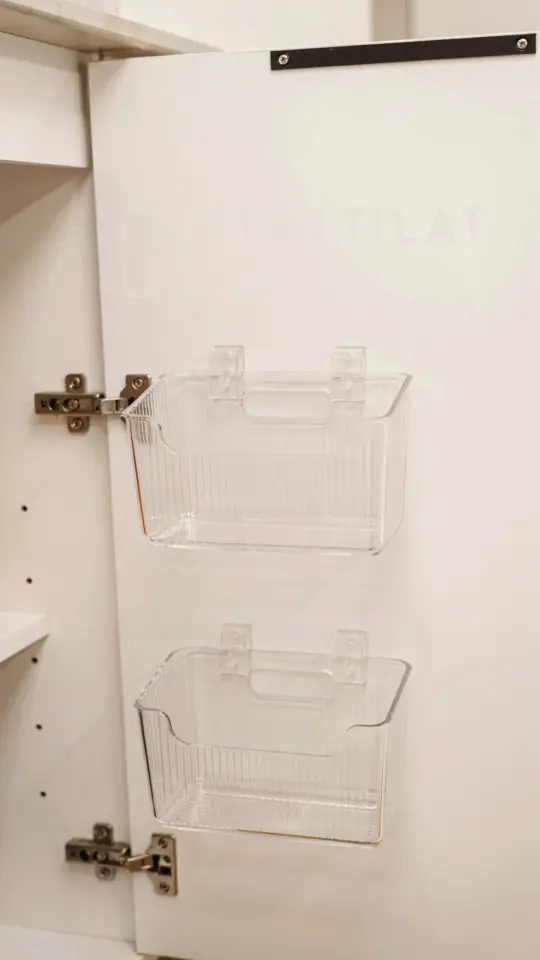
We all know the drill. You need dish soap, you open the cabinet under the sink, and suddenly you are playing a frustrating game of 3D Tetris with old sponges, a leaky bottle of all-purpose cleaner, and that spare roll of paper towels you swear you just bought. It’s the most annoying thing to deal with. That’s why I finally tried Cabinet Door Storage Under Sink, and honestly, it has changed my entire cleaning routine for the better. I added two acrylic organizer bins to the inside of the door, and now my daily must-haves are right there, no digging required.
Zero rearranging. Zero frustration. It sounds too simple to be effective, but the trick is all in the placement. You don’t need a major renovation or custom cabinetry to fix this; you just need the right size of clear bins and a few minutes. And look, I didn’t spend a fortune on a fancy system. I bought two basic acrylic bins at a discount store, and they work like a dream.
## What to Look For in Under Sink Adhesive Organizers
Picking the wrong bin is the only way this project fails. The round ones are a disaster. They tip over, they waste vertical space, and they make me irrationally angry. You want a bin with a flat back, a low profile, and a solid bottom.
Measure your cabinet door first. This is the step everyone skips, and it will bite you in the butt. I have a standard 18-inch wide cabinet door, and a bin that is roughly 8 inches wide by 4 inches deep fits perfectly without blocking the frame. If you buy something too bulky, the door won’t close. That’s it, that’s the whole game.
You also need to consider the weight. Acrylic is light, but the adhesive strips have to do the heavy lifting. Most kits come with heavy-duty double-sided tape, but if yours doesn’t, buy separate mounting strips. The ones made for command hooks are usually strong enough, but make sure the surface is clean and dry before you stick anything on.
## How To Install Cabinet Door Storage Bins
Ok so, the installation is the easiest part of this entire process. You are not doing surgery with a drill; you are just sticking a plastic box to a door. Clean the door panel with rubbing alcohol to remove any grease or residue. Let it dry for a minute.
Take your bin and push the mounting tape firmly against the back of it. Then, press the bin onto the door and hold it there for a good 30 seconds. That pressure is what seals the deal (and yes, I counted in my head while I was doing it, because I was scared it would fall).
Give the adhesive 24 hours to cure before you load it up. I know, I know, you want to organize right now. But if you load heavy bottles on there immediately, you risk pulling the whole thing off the door. Wait a day. Put a sponge and a bottle of soap in there, and it’s done. Honestly, I should write a manual for how easy this is, because it took me longer to type this paragraph than it did to install the first bin.
## Storing Daily Use Items Inside the Door
So, what actually belongs on the cabinet door? Think about what you grab when your hands are already wet or covered in chicken juice. For me, it is dish soap and the scrub brush. That is the main event. It’s the high-frequency stuff that should live here, not the bleach you use once a month.
Here is a quick list of things that work well in these door bins:
– A small bottle of dish soap.
– Magic erasers and scrub pads.
– A bar of soap (for handwashing).
– Spare bags or sponges.
– A tiny spray bottle of daily cleaner.
The secret is to only stock the items you touch every single day. This is not storage for the overflow stuff. It’s a landing strip for the essentials. If you live in a hard water area like I do, you might also keep a little squeegee here. That little detail saves me so much time.
## The Best Affordable Bins for the Job
You don’t need to buy a specialized “under sink system” that costs forty dollars. Look for generic acrylic bins meant for bathroom vanities, because they are basically the same thing at half the price. I found mine in the dollar section of a big box store, and they have lasted over a year without cracking.
Here’s the thing: clear acrylic is superior to wire or mesh. It doesn’t rust, it doesn’t scratch the door, and you can see exactly what is inside without pulling it off the track. If you want to get fancy, buy a bin with a slightly angled lip, but straight edges work fine for a smooth cabinet panel. Just avoid anything with a curved base.
If you want to avoid adhesives entirely, check for friction fit options or over-the-door hooks. Some bins come with a lip that hooks over the top edge of the cabinet door. That works well too, but it can sometimes scuff the paint. The sticky tape method is actually cleaner in the long run.
## Why Using Acrylic Bins Works Better Than Shelves
Cleaning under the sink is the worst chore. I hate it. And the main reason it gets so messy is because shelves force you to stack items in the dark. Acrylic door bins change the plane of storage. You are physically pulling the items toward you when you open the door.
It also eliminates the “black hole” effect of a deep cabinet. Instead of reaching around in the dark, you have a visual inventory. With a shelf, you have to pull everything out to see what’s behind the plunger. With the door rack, it’s all right there. Plus, it keeps the bottles upright so they don’t leak all over the place.
I have to admit, the other under-sink areas are still a bit chaotic in my house. The door is the only organized part, but it makes me feel like I have my life together just a little bit more. It also keeps the chemicals away from the kids, sort of. Since they can’t easily reach the inside of the door when it’s closed, it adds a tiny bit of safety, which I appreciate.
## Common Mistakes to Avoid When Organizing
The biggest mistake people make is overloading the door. These bins are not meant to store the giant 40-ounce bottle of detergent. They are for the small, daily squeeze bottle. If you put something too heavy in there, the tape will give out at 3 AM and you will wake up to a sticky mess. Trust me, it happens.
Another mistake is buying frosted or colored bins. They look cute in the store, but they defeat the purpose of instant visibility. Stick to clear. And please, for the love of all that is holy, don’t buy a bin with a solid back if you have a raised panel door. It won’t sit flush, it will wobble, and you will hate it. A flat-backed bin is the only safe bet.
Also, don’t forget to account for the hinges. If you stick a bin too close to the hinge, it will catch and snap off. Give yourself at least an inch of clearance on the hinge side. I learned this the hard way when I had to scrape a broken piece of plastic out of my hinge. It was chaotic.
## Realistic Expectations and a Quick Material Guide
Acrylic isn’t indestructible. It will scratch if you scrub it with a rough sponge, but it handles normal wear and tear perfectly. To clean the bins themselves, I just wipe them with a damp cloth and a little vinegar. They come out looking brand new, which is more than I can say for the rest of my sink area.
Here is what I keep on my own door and the order I put them in:
– Top bin: Dish soap and a bottle brush.
– Bottom bin: A small stack of clean washcloths.
I used to try and keep a sponge in there, but it never dried out because the cabinet is humid. So now the sponge lives on the sink edge. You have to adjust for your own habits. This system works if you use it, not if you just look at it and think about using it. Make it a rule for yourself: if you have to move something to access the bin, you have too much stuff.
There is a calm reassurance in opening that cabinet and seeing everything exactly where you left it. It removes a tiny bit of chaos from the day. And honestly, for the ten minutes it takes to install, it’s the only home organization project I have ever completed without quitting halfway through. Don’t overthink it, just stick the bins on the door and enjoy the simple win.
This post was researched and drafted with AI assistance, then personally reviewed and edited by Mia before publishing.
Leave a Comment