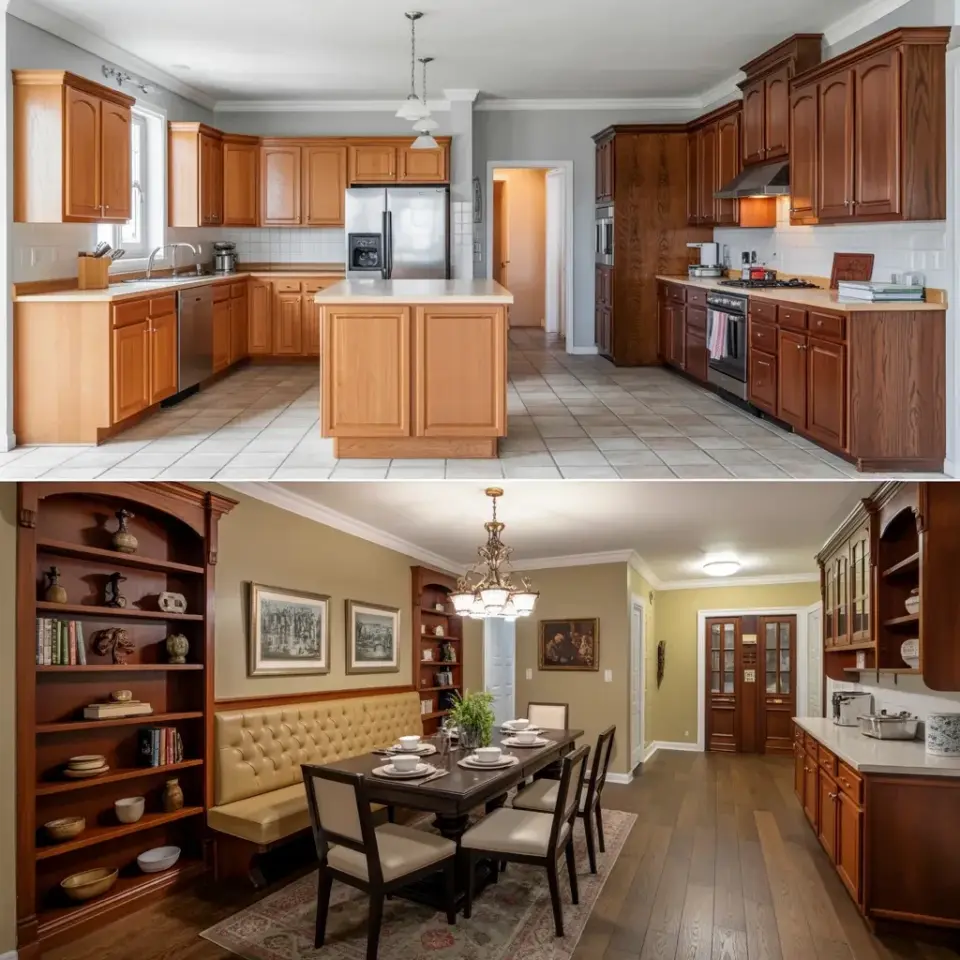
Look, you don’t have to live with kitchen cabinets you dislike just because a full remodel isn’t in your credit card’s comfort zone. I’m looking at a photo right now that proves how much muscle a simple cabinet color swap can carry. This budget kitchen remodel started with the same light oak cabinets, beige ceramic tile floors, and gray walls that half of America seems to have inherited. The after image shows a space that suddenly feels expensive, moody, and custom, with dark brown wood cabinets and the busiest little open shelves you’ve ever seen packed with books.
The trick wasn’t a massive structural overhaul. It wasn’t splurging on custom cabinetry or new appliances. It was making smart, strategic changes that cost a fraction of a full renovation. If you’re scrolling for inspiration because your kitchen feels dated but your budget says “cool it,” you’re in the right place. Here are the common mistakes people make when trying to pull off a low cost kitchen update, and how to avoid them.
First, Ignore the Fancy Cabinet Door Catalogs
The biggest error I see homeowners make is assuming a fresh look demands fresh cabinetry. New custom cabinets can easily run you five figures, which is absolutely insane if you’re just trying to refresh a rental or flip a house. In this remodel, they kept the existing cabinet boxes and upgraded the look with dark, rich brown wood finishes. That’s a world of difference without tearing out the structural heart of the kitchen.
Before you even think about paint color or hardware, assess what you actually have. Are the cabinet doors in decent shape? Do they close properly? If the bones are solid, you don’t need new bones; you need a better suit. Prioritizing a low cost kitchen update means working with your existing layout and focusing on surface-level drama.
You Don’t Need New Cabinets, You Need Color
Here’s the thing about light oak: it has a tendency to wash out a room, making everything feel a bit beige and forgettable. Swapping that light oak for a darker, richer brown wood finish did more for this kitchen than any appliance upgrade ever could. It’s not just about being dark; it’s about the undertone. The brown here isn’t a flat, muddy mess; it has a warm depth that draws your eye and makes the stainless steel appliances pop.
My advice? Don’t be afraid of the dark. It doesn’t make a kitchen feel smaller; it makes it feel cozier and more intentional. If you want to achieve this look without a full professional refinishing, try a liquid sander and a high-quality gel stain. It’s messy, honest work, but it costs a fraction of a factory refinish.
Open Shelving Is a Budget Move, Not a Design Trend
Seriously, if you’re looking at the “after” photo, look at the sides of the cabinets. Built-in shelving on both sides, loaded with books and decora, is what turns this from a simple paint job into a styled makeover. You don’t need to hire a contractor to build floating shelves from scratch. We’re talking about standard wood planks, some heavy-duty brackets, and a level. It’s one of the most rewarding DIY kitchen projects because it’s instantly gratifying.
But there’s a catch. Open shelving forces you to declutter. You can’t hide your mismatched Tupperware or that weird mug collection on an open shelf. You have to curate. Use it for cookbooks, plants, nicer glasses, and small decorative objects. Mixing in those personal styling elements is what makes it feel like a budget kitchen remodel with high-end charm.
Hardware Is the Cheapest Therapy a Kitchen Can Get
Ok so you’re looking at the darker cabinets and thinking, “I can’t afford new pulls for every single door.” Yes, you can. Stop that thought. Though the photo focuses on the massive color shift, don’t underestimate what new handles and knobs do for the overall vibe. That tactile change, the feel of a solid, new piece of metal in your hand, completely alters your daily experience of the room.
This is part of a successful cabinet makeover because it’s the detail people notice subconsciously. You can find affordable matte black or brushed gold hardware online. It takes about an hour to swap out all the existing pulls with a screwdriver. It is cheap, it is easy, and it looks like you were really serious about your kitchen makeover.
Let the Backsplash Do the Heavy Lifting (or Not)
You might be tempted to tear out that boring gray wall paint or old tile and replace it with expensive marble. Hold your horses. In this before-and-after renovation, the walls remain a light gray, and it acts as a neutral backdrop for the dark cabinets. The floor is still that large beige ceramic tile, and yet the room looks brand new. Why? Because the contrast of the dark wood creates the visual interest.
If your budget is strictly “lowcost kitchen update,” paint the walls yourself first. See how the light interacts with the new dark cabinets. You might find you don’t even need a tile upgrade. If you do want a change, use peel-and-stick tiles for a temporary update. They’re far less terrifying than demo work, and they won’t wreck your security deposit if you rent.
Don’t Forget the Lighting When You Look at Your Old Kitchen
The “before” photo has pendant lights hanging, but they don’t really mean much in that bright, oak-heavy space. In the “after” shot, those pendants are doing so much more work because they’re illuminating the rich brown tones. Lighting is the secret weapon of any budget kitchen remodel. You can change the whole mood with warmer bulbs or new drum shades.
I made a mistake once pulling down a fixture without turning off the breaker, and the jolt reminded me why I hire professionals for electrical stuff. That’s my one weird tangent for the day. Anyway, changing lighting fixtures is usually a simple task for a handyman, and it has a massive impact. Aim your lighting toward the work zones and the open shelving to create little pockets of drama.
Pacing Yourself Is Part of the Plan
A kitchen remodel on a budget can’t happen in a weekend if you’re doing it right. It’s a process. First, you refinish the cabinets. Then you wait for them to cure. Then you hang the hardware, then you style the shelves. There’s no reason to panic and buy everything at once. In fact, pacing out your purchases gives you time to find sales on things like pendant lights or bar stools.
Don’t fall into the trap of trying to mimic a high-end magazine spread overnight. This low cost kitchen update worked because it prioritized sequence: cabinets first, styling second. You’ll be surprised how motivated you feel when you walk in every morning and see the progress, even if it’s just the new wall color drying.
—
So here’s the bottom line: that dramatic before-and-after picture isn’t the result of a huge budget. It’s the result of avoiding the mistake that you have to replace everything to change everything. Look, you can achieve a stunning kitchen makeover with dark wood cabinets, a little elbow grease, and a clear focus on what really matters: contrast, hardware, and smart styling.
If you’re planning to tackle your own cabinet color change soon, I’d love to know what finish you’re leaning toward. Are you going deep and rich like this one, or are you trying a different shade of wood? Save this for inspo when you’re at the store staring endlessly at paint chips, and just pick the bold one. You won’t regret it. 😊
This post was researched and drafted with AI assistance, then personally reviewed and edited by Mia before publishing.
Leave a Comment